Monday, May 2, 2011

FREE Close to My Heart products


In honor of National Scrapbooking month Close to My Heart is offering half price membership and 4 FREE scrapbooking kits to those who sign up as consultants during the month of May. The cost to join is now only $65 and for that prices you receive +/-280.00 worth of scrapbooking kits, inks, stamps and embellishments with no strings attached.

Whether you are just looking for scrapbooking supplies, or you have an interest in becoming a consultant - this is a deal you won't want to miss. Should you need assistance, or more information, feel free to Email me (link on the right) for more details on how to get all these goodies for yourself. I promise you - there is no further purchase required and this is a deal too good to pass up!
  • From http://okispice.myctmh.com you will need to go to "Your
    Opportunities" at the bottom of the left-side bar. 


  • Next under "Be A Consultant" at the bottom of thepost it says "Click Here"
    and you will begin sign up.

  • You will need to put in a Credit Card information and give that card a name.
    For example, I call my card "Mileage Card".


  • Next, choose 3 of the "Choose Me" packages listed. If you want more than 3,
    you will pay a bit extra but you do have that option.


  • Then you will be done and you should receive immediate confirmation that you
    are a Consultant and will receive your own Consultant number! 
  • Thursday, April 28, 2011

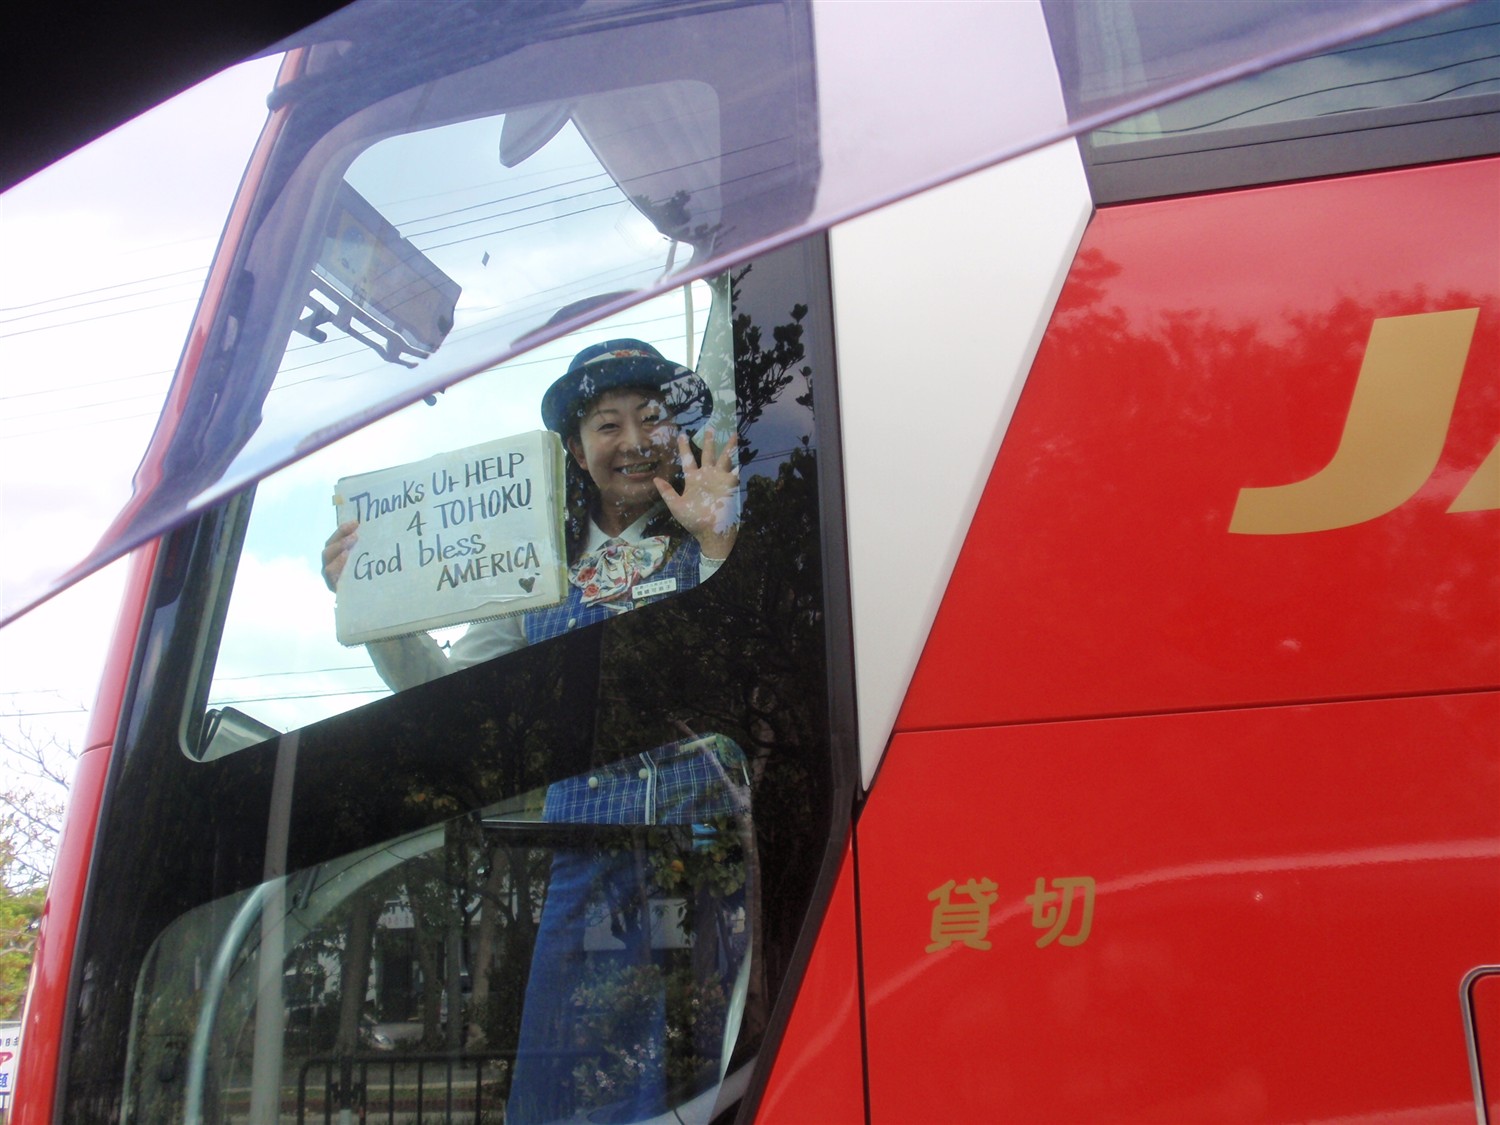
    God Bless America and Japan

    Last Friday, while returning from a trip north, we experienced a moment that I thought should be shared...
    As my husband and I drove into the city of Nago and were slowing down to stop for a traffic light, the JAL tour bus pictured, pulled up beside us. The tour-guide in the photo began waving excitedly until she got our attention, at which point she raised the handmade sign you see in the photograph. We were both very happy and extremely touched by this unsolicited show of affection and gratitude towards America. To us, this is yet another reason that we love Japan and her people. It is also a testament to the level of support we all, as Americans, have provided. Our military has jumped in with both feet and we have all opened our hearts and sent or given whatever support we can. Given the political differences we have experienced in the past, it is nice to know that not everyone thinks our presence is a bad thing.
    God Bless America and God Bless Japan!


    In March of 2010 I visited the beautiful Shukkei-en gardens in Hiroshima. The cherry blossoms were in full bloom and it must have been an auspicious day for a wedding as the gardens were filled with happy couples posing in their wedding finery.

    I can only imagine the very different scene that took place this year as the country recovers from the damage that has been caused by the terrible earthquake and tsunami.

    Though I currently live in the southern island of Okinawa, my heart remains in the enchanting Honshu province of Japan. I would like to share with you some of my Mosaic Moments pages of my time in Japan in the hopes that if you have not yet helped out the tusnami victims, you might still find it in your heart to consider a donation to the Red Cross .
    All these pages were made with Mosiac Moments papers. If you would like to purchase some Mosaic papers, click the SnapNCrop link to the right of this post. Thanks for stopping by!

    Sunday, March 13, 2011

    Close To My Heart

    Recently I joined Close To My Heart as a consultant as I have been going to a monthly club and really enjoying myself there. There are many items in their current catalog that I find to be of the utmost quality and I wanted to share some of them with you.

    First up, I really love the album labels. Even though I have albums in various colors and sizes I still couldn't seem to find the one I want when I was looking for it. With these nifty labels, I can now easily browse for the album I want and so can my friends and family should they feel like taking a look.

    Next, I really love the ink. Not that I am a super-stamper or anything, but I love to ink the edges of my pages or embellies for added dimension and this ink is so perfect. I love the colors that match all the papers and the packaging with the easy-to-read labels. The storage tower makes my ink easy to store and I got it for a steal when it was my turn to hostess our group!

    I also love to use the Sponge Daubers and have one for each ink color. I keep these in the tray on the top of the tower. You can see there is also room for the markers.

    I would also like to share with you a few of the pages we've done at our club meetings.

    The above page was made with the Miracle papers, Canvas Buttons and The Delight Stamp Set. My scan did not come out quite right on this page, unfortunately.

    The Relax page was created with the Wings paper, Mini Medly Black Accents, Wings Assortment Ribbons,  and the Dreams Come True stamp set.

    Oliva paper collection, Foundry Flourishes and Mocha Opaques complete the page above.

    And just for fun, here are two more pages I made last year from beautiful Close To My Heart papers and stamp sets.


    If you would like to make any of these pages or purchase any of the supplies I've mentioned here, go to my link or click on the shopping cart above right. I'll be starting a monthly club soon and welcome new members, whether locally or online!


    Sunday, January 23, 2011

    How to make pretty paper roses out of heart shapes.

    As a scrapbook instructor, I always have to be one step ahead of myself. So while I still have Christmas photos to get into an album, I'm busy making Valentine pages for next month's scrapbook classes. No problem though as I know my students are going to love this next project. It's fun, simple and each rose took me less than five minutes start to finish! They look great on my scrapbook page too. Check out the photo at the bottom of this post for my final result. Meanwhile, here is how to make your own:

    1. The roses are made with a series of 19 hearts in different sizes. I used the Cricut and the Plantin Schoolbook cartridge to cut mine out of some pretty pink papers in the following sizes:
                  a. Five 2" hearts
                  b. Four 1 ½” hearts
                  c. Four 1 ¼” hearts
                  d. Four 1” hearts
                  e. Two ½” hearts
    Of course, you could also cut the hearts with punches or even hand-cut them for an interesting look.

    2. In addition, you will need a tiny hole punch (a push pin works just as well); scissors; a skewer, stylus or pencil; a brad; some ink and Stickles ( I used Cotton Candy pink).


    3. Punch tiny holes in the bottom of each heart.


    4. Cut each heart about ¾ of the way in half to make petals. At this stage you can distress and Ink the edges of all petals if you desire.


    5. Curl (don’t roll) each petal using a skewer or a stylus.


    6. Beginning with the smallest hearts first, layer the hearts onto the brad.


    7. Finish with stickles and let dry about 20 minutes.


    To make a smaller flower, repeat steps b-e above, but make one extra b size ( 1 1/2") heart.

     And finally, here are some heart-roses on a page using Bo Bunny's Crush line. Have fun making your own heart-roses and if you do, I would love to see your final result! And if you are on Okinawa and would like to join me, the class is at Foster Fine Arts Center on Feb. 17. I would love you to join me!

    Wednesday, December 15, 2010

    Holiday Fun

    Not much scrapping for me lately. I've been cooking, shopping, wrapping and all the other fun things that keep us busy during the holiday seasons. I really like the way this one particular project turned out though. I framed some photos for our families in shadow boxes filled with bits of sea glass, tiny shells, small peices of coral picked up along the beach here plus tiny shards of Ryukyu glass . I hope our parents and siblings like them!

    This one is ready for mailing to my Mom. She loves sea glass.

    Here's a close up of the bits that surround the photo. They are sandwiched between two pieces of glass.

    And this one is filled with lots of tiny shells and coral for my sister-in-law.

    I got a bit of scrapbooking done earlier in the month while at a retreat in Okinawa. I had this great view from my cabin.

    Here's our group of scrappers. You can tell how much fun we were having!

    And here' some of the pages I got done during the retreat.


    We had lots of make-n-takes and mini classes too. So much fun! Glad I went because I'm not exactly the scrapping queen this month. I have taken my scrap room apart and am in the middle of a reorganization. I'll be clean and fresh and ready to go again in the New Year.
    Happy Holidays and Merry Christmas to all!

    Sunday, November 28, 2010

    Making a Star Album for Christmas


    Over the years I have taken many of my favorite family photos during the Christmas season, so I decided  why not highlight a few of those in a star-shaped mini album? Star albums are 6x6" mini albums that open up into a star-shape display.  You'll want to make one for yourself as well as a few for gifts. They are fun to make and easier than you may think but do take up a lot of cardstock and patterned paper  -- so make sure you have plenty before you get started.

    Here is the supply list I used followed by some instructions. I would love to see how yours comes out, so please share a link if you use my instructions. Meanwhile, have a very Merry Christmas!

    Supplies

    1. Three sheets of Bazzill Red cardstock
    2. Three sheets Bazzill Yukon Gold cardstock
    3. Three sheets of Basic Grey Wassail patterned paper
    4. Two pieces of chipboard 6x6”
    5. Two sheets of Bazzill Metallic Gold paper for cover
    6. Two 12” pieces of 1” wide ribbon
    7. Heavy-duty adhesive such as Red Line tape or Book Binding Glue
    8. Embellishments of your choice

    Cover


    A. Cut two pieces of Bazzill Metallic Gold paper into 8x8” squares.

    B. Place these pieces face down and glue the 6x6” piece of chipboard in the center of the back of each.
    
    Photo C.
    
    C. Trim off each corner of the Metallic paper leaving a 1/8” of space on each corner. (Photo C)


    D. Add some glue strips around each edge and fold over the edges of the paper. (Photo D)


    E. Lay the two pieces down in front of you and glue a piece of ribbon onto each. The long ends of the ribbon should run to your left on the left page and to the right on the right-hand page.

    Building the Star Points

    A. Trim the tag ends off of the Wassail patterned paper.

    B. Cut your cardstock as follows:

             a. Red – 12x6”

             b. Yukon Gold – 11x6”

             c. Wassail – 10x6”

    C. You should now have 6 pieces of each color. Fold each in half.

    D. Run a piece of Red Line tape along the short inside edges of the Red and the Yukon Gold papers.

    E. Lay the Yukon Gold paper on top of the Red paper and adhere only the edges together.

    F. Lay the Wassail paper on top of the Yukon Gold paper and adhere only the edges together.

    G. Each star point is made of three layers of paper and now that you have six of these together, you will begin to see the star emerge.
     
    Assembly


    A. Glue the back of one of your stacks to the left-hand cover. 

    B. Continue gluing each red layer back to back until you have glued the back cover on the last page.

    C. Decorate the inside pages to your liking.


    D. Tie the album open and display on a table.

    Tuesday, November 2, 2010

    Playing with my Cricut

    Recently I bought a Cricut Expression. I love that I can cut up to 12 x24 if I want to, though just cutting 12x12 is exciting enough for me. I've only got a few cartridges -- and I can see that I'm going to be buying a lot more.
    For this page I borrowed the Summer Vacation catridge from a friend as it offers a Ferris wheel shape, perfect for my neighborhood! I glittered it with Martha Stewart glitter so that it very nearly resembles the real thing!

    One of things I don't like about the Cricut is the inability to change the weight of the fonts. For the word 'hood' I wanted some letters that were hefty but not tall and my Cricut would not let me do that with the font cartridge I own. So I turned to my Wishblade to cut all the words in the title shown here as it allows me to stretch my letters in any direction I so choose. The Wishblade's downfall is the steep learning curve and though I've had it for 4 or 5 years now, I've never been able to cut anything on it but titles and circles.

    So for ease of use, the Cricut is the winner hands down. I can't wait to get some more cartridges so I can get scrappin'! If anyone wants to know what's on my Christmas list this year, just let me know!